The Critical Role of the Final Coat in Architecture
The structural integrity of a building lies in its foundation and masonry, but its aesthetic value and perceived quality depend entirely on the final visible surface. In the realm of Interior wall finishing, the margin for error is zero. The base coat of plaster (browning or rendering) is designed to level the masonry and provide a flat substrate, but it is inherently rough, porous, and completely unsuitable for direct decoration.
This is where the exact science of applying finish plaster becomes the most crucial phase of interior construction. The final coat, typically ranging from 1 to 3 millimeters in thickness, dictates how light interacts with the wall, how paint adheres to the surface, and ultimately, the longevity of the interior decor. Failing to execute this step flawlessly results in immediate visual defects that no amount of premium paint or wallpaper can hide.
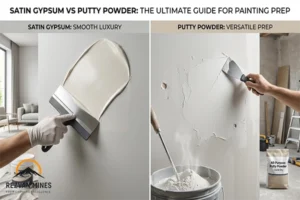
When architects and high-end contractors specify a smooth wall finish, they are not relying on the painter to fix the wall’s imperfections. They rely heavily on the plasterer’s technique and the chemical properties of the material used during the skimming process. Mastering the technique of applying finish plaster means understanding hydration rates, trowel pressure, and material selection. Using a standard, coarse gypsum for this final layer is a fundamental engineering error. You must utilize a highly refined product specifically milled for this purpose, such as Finishing Plaster (White Gypsum).
The Anatomy of a Flawed Wall: Why Standard Practices Fail
Before detailing the precise methodology of applying finish plaster, it is critical to understand why so many interior walls fail modern quality inspections. When natural or artificial grazing light hits a wall, microscopic undulations cast long shadows, creating a wavy, amateurish appearance. This is a direct result of incorrect material selection and poor application techniques.
Common failures caused by neglecting the proper finish plastering process include:
- High Paint Absorption and Flashing: A rough base coat acts like a sponge. If a dedicated Finishing Plaster (White Gypsum) is not applied, the wall will absorb the primer and paint unevenly. This leads to “flashing”—areas of the wall that look noticeably duller or shinier than others.
- Ghosting and Grazing Shadows: Modern interior design heavily features LED strip lighting and wall washers. These lighting techniques are unforgiving. Incorrectly
applying finish plasterleaves trowel marks, ridges, and hollows that become glaringly obvious under directional light. A truesmooth wall finishmust be functionally flat and mathematically planar. - Surface Delamination: Applying a new layer of plaster over an overly dry or dusty base coat prevents chemical bonding. The final layer will eventually flake, peel, or detach entirely when subjected to fluctuations in humidity or temperature.
Why Mastering Applying Finish Plaster is Non-Negotiable
The financial implications of a poorly finished wall are significant. Remedial work requires sanding, filling, and multiple extra coats of expensive high-build primers, which destroys project timelines and profit margins. Doing it right the first time by correctly applying finish plaster is not just about aesthetics; it is about economic efficiency on the job site.
The dynamics of the final coat are entirely different from the base coat. While the base coat is about volume and leveling, the finishing phase is about surface tension and microscopic smoothness. The trowel angles are steeper, the water-to-plaster ratio is different, and the timing of the final trowel passes must sync perfectly with the gypsum’s setting curve.
To achieve the ultimate glass-like surface without excessive physical exertion, the raw material matters just as much as the manual labor. You cannot achieve a flawless result with low-grade powder. The upcoming sections will break down the exact technical specifications of Finishing Plaster (White Gypsum), the precise mixing ratios, and the step-by-step troweling mechanics required to master applying finish plaster and eliminate surface defects permanently.
The Engineering Behind Premium Finish Plaster
You cannot cheat physics, and you cannot override the limitations of poor materials with manual skill alone. When applying finish plaster, the chemical and physical properties of the dry mix dictate the final outcome. Attempting to achieve a flawless, mirror-like surface using standard, coarse base-coat gypsum is a critical error that leads to endless sanding, excessive dust, and inevitable surface defects.
To master applying finish plaster, you must first understand the concept of micronization and particle size distribution. Base coats are heavily aggregated; they are designed to build thickness rapidly and bridge large gaps in the masonry. However, for the final 1 to 2 millimeters, the requirement shifts dramatically. You need a Fine gypsum powderwhere the particles are milled to extreme precision.
This is exactly where Finishing Plaster (White Gypsum) separates itself from generic plaster products. Through advanced calcination and micro-milling processes, the particles in Finishing Plaster (White Gypsum) are uniform and exceptionally fine. When mixed with water, this Fine gypsum powder creates a dense, creamy matrix free of gritty inclusions. As you trowel the material, these microscopic particles align perfectly flat against each other, eliminating friction and allowing the steel trowel to glide. This is the absolute foundation of a true Smooth wall finish.

Skim Coat Gypsum vs. Base Coat Plaster: The Structural Difference
There is a fundamental misunderstanding in the construction sector regarding the terms “plastering” and “skimming.” Plastering typically refers to the heavy, high-build base coat. Applying finish plaster, on the other hand, is specifically a skim coating process.
A high-quality Skim coat gypsum acts as a surfacing agent rather than a structural filler. The chemical additives and the purity of the gypsum ore used in Finishing Plaster (White Gypsum) are engineered to control the hydration rate (the setting time). If a plaster sets too rapidly, the tradesman has zero open time to polish the surface, resulting in hard ridges and trowel marks. If it sets too slowly, the material will sag and fail to bond correctly to the substrate.
The engineered open time of Finishing Plaster (White Gypsum) is precisely calibrated. It provides enough working time for applying finish plaster across large wall expanses, allowing for the critical final passes—often referred to as the “polishing” or “closing in” phase. During this phase, the plasterer uses a wet trowel on the setting plaster to compress the surface molecules, creating a highly polished, dense skin that is almost impenetrable to paint absorption.
Preventing Plaster Cracks Through Material Superiority
One of the most catastrophic failures in Interior wall finishing is the development of micro-cracks or “map cracking” shortly after the plaster dries. These defects destroy the aesthetic value of the project and demand costly rework. Preventing plaster cracks is not just about environmental control; it is deeply tied to the formulation of the plaster itself.
Cracks occur primarily due to shrinkage during the drying phase or differential thermal expansion between the base coat and the topcoat. When applying finish plaster, you are introducing moisture back into the base coat. If the finish plaster lacks the correct water-retention properties, the base coat will aggressively suck the moisture out of the skim coat. This rapid, uncontrolled dehydration causes the surface matrix to violently shrink and fracture.
By utilizing a dedicated Skim coat gypsum like Finishing Plaster (White Gypsum), you mitigate this risk entirely. The proprietary formulation retains its hydration water just long enough to cure evenly, drastically reducing the shrinkage coefficient. Furthermore, the high purity of the white gypsum yields a superior tensile strength in ultra-thin layers.
Successfully applying finish plaster means anticipating these chemical reactions. You are not simply wiping mud on a wall; you are initiating a controlled chemical curing process. When the right material is paired with the correct substrate preparation, Preventing plaster cracks transforms from a hopeful guess into a guaranteed, engineered outcome. Applying finish plaster with a chemically optimized product is the only definitive way to secure a permanent, zero-defect surface.

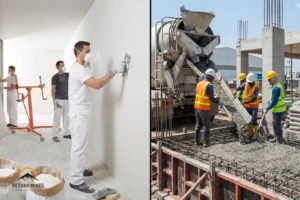
Step-by-Step Guide: The Mechanics of Applying Finish Plaster
Execution is where theory meets reality. You can possess the highest grade of Finishing Plaster (White Gypsum), but if your trowel mechanics, water-to-plaster ratios, or timing are flawed, the result will be a catastrophic failure. Applying finish plaster is a multi-stage process that demands speed, precision, and a deep understanding of the material’s curing cycle.
The application of interior gypsum plaster is governed by strict technical guidelines to ensure structural integrity and surface uniformity. The procedures outlined below align with the principles detailed in the official ASTM C842 – Standard Specification for Application of Interior Gypsum Plaster, which mandates specific thickness, substrate conditions, and multi-coat methodologies for optimal Interior wall finishing.
Phase 1: Substrate Preparation and Suction Control
Before applying finish plaster, you must assess the “suction” of the base coat. The base coat must be completely flat, structurally sound, and free of dust or efflorescence. More importantly, it must have the correct moisture absorption rate.
If the base coat is too dry, it will violently aggressively extract moisture from the Skim coat gypsum. This rapid dehydration halts the chemical curing process of the topcoat, leading directly to shrinkage and map cracking. To mitigate this and succeed in Preventing plaster cracks, the base coat must be lightly misted with clean water or treated with a diluted PVA bonding agent. This equalizes the suction, allowing the finish coat to cure at its engineered rate.
Phase 2: Mixing the Fine Gypsum Powder
The chemistry of applying finish plaster begins in the bucket. Contamination is the enemy. Always use a clean mixing bucket and clean, potable water.
- Water First: Never put the powder in the bucket first. Always start with the required volume of water.
- Sifting: Sift the Finishing Plaster (White Gypsum) evenly over the surface of the water. Do not dump it in a single pile. Allow the powder to absorb the water and sink for approximately 60 seconds.
- Mechanical Mixing: Use a low-speed mechanical mixer. High-speed mixing introduces trapped air bubbles into the
Fine gypsum powder, which will later burst under the trowel, leaving deep pinholes in yourSmooth wall finish. Mix until the consistency is entirely lump-free, resembling thick, heavy cream.
Phase 3: The First Coat (Laying On)
Applying finish plaster is generally executed as a two-coat skim process, achieving a total thickness of 1.5 to 3 millimeters.
Load your stainless-steel finishing trowel and apply the first coat firmly onto the base coat. The objective here is not aesthetic perfection; it is coverage and bonding. Apply the plaster with heavy pressure to force the material into the microscopic pores of the base coat. Keep the trowel angle shallow (around 15 degrees) to spread the Finishing Plaster (White Gypsum) evenly across the surface. Do not obsess over minor trowel ridges at this stage.
Phase 4: The Second Coat (Laying In)
Timing is critical. Do not wait for the first coat to dry completely. As soon as the first coat has “firmed up” or “picked up” (it is no longer wet to the touch but still highly pliable and cold), you must immediately apply the second coat.
When applying finish plaster for the second coat, use a slightly thinner consistency of Finishing Plaster (White Gypsum). Apply this layer directly over the first coat. This second application fills in the hollows and ridges left by the first pass. This is where the true flattening of the wall occurs.
Phase 5: Troweling Up and The Final Polish
This is the defining phase of Interior wall finishing. As the plaster begins its chemical set, it will become progressively stiffer. You must perform a series of troweling passes to compress the surface.
- Flattening: Run a clean, damp trowel over the surface to remove high spots and ridges. The angle of the trowel should increase slightly.
- Closing In: Wait until the plaster darkens slightly (indicating the chemical set is accelerating). Splash a minimal amount of water onto the surface using a masonry brush—do not drench the wall. Using firm pressure, run the trowel over the wet surface. This compresses the
Fine gypsum powderparticles, creating a dense, non-porous skin. - The Polish: The final pass of
applying finish plasteris done when the material is almost entirely set. The trowel is held at a steep angle, and extreme pressure is applied. The friction of the steel against the setting Finishing Plaster (White Gypsum) generates a highly polished, glass-likeSmooth wall finish. This compressed surface is what prevents paint flashing and completely eliminates grazing light shadows.
Advanced Troubleshooting: Identifying and Eliminating Surface Failures
When applying finish plaster fails, it fails spectacularly. There is no hiding a defective Smooth wall finish under a layer of paint; in fact, high-gloss paint will magnify every single flaw. Understanding the root causes of these defects is non-negotiable for professional Interior wall finishing.
Delamination and Blistering
If the Skim coat gypsum peels away from the base coat in sheets or forms hollow blisters, the bond has been compromised. This is a direct result of improper substrate preparation before applying finish plaster. Common culprits include a heavy dust layer on the base coat, excessive efflorescence, or using a highly contaminated water source. Furthermore, if the base coat’s suction was completely killed (e.g., heavily sealed with PVA without any tackiness remaining), the Fine gypsum powder cannot achieve a mechanical key.
Discoloration and Yellowing
A premium product like Finishing Plaster (White Gypsum) is engineered to dry to a brilliant white finish. If yellowing occurs, it is not a defect in the plaster; it is a result of external contamination. Iron oxides leaching from rusted corner beads, contaminated mixing water, or nicotine and tar bleed-through from the underlying masonry are the primary causes. To prevent this, ensure all metal lathe and corner beads are galvanized or heavily primed before applying finish plaster.
Pinholing and Craters
As mentioned in the mixing phase, entrapped air is fatal. If you use a high-RPM drill to mix the Finishing Plaster (White Gypsum), you inject millions of microscopic air pockets into the wet mix. During the troweling process, these bubbles burst, leaving crater-like pinholes across the surface. Once again, applying finish plaster requires low-speed mechanical mixing and adequate slaking time to allow entrapped air to escape naturally.

The Economic Mathematics of Premium Gypsum
Contractors often make the fatal error of evaluating plaster strictly by the cost per bag. This is a mathematically flawed approach. The true metric for applying finish plaster is the applied cost per square meter, which factors in material coverage, labor hours, and post-plastering rework.
We can analyze the material efficiency using a standard coverage equation:
E=A×t×ρVmix
Where:
- E represents the efficiency coefficient.
- Vmix is the volume of the hydrated Finishing Plaster (White Gypsum).
- A is the total coverage area.
- t is the application thickness (typically 1.5mm to 2mm).
- ρ is the density of the cured plaster.
When applying finish plaster using a highly refined, high-yield Fine gypsum powder, the workability (open time) increases, meaning a single tradesman can cover significantly more area (A) in an 8-hour shift.
Furthermore, standard-grade plasters shrink unpredictably, necessitating a third filler coat or extensive sanding to achieve a Smooth wall finish. By using a stabilized Skim coat gypsum like Finishing Plaster (White Gypsum), the shrinkage variable approaches zero. This engineered stability is the primary mechanism for Preventing plaster cracks.
Every hour spent fixing cracks or sanding heavy trowel marks destroys the profit margin of an Interior wall finishing project. Applying finish plaster with a chemically superior product eliminates these dead-labor hours. The wall is glass-smooth directly off the trowel, requiring zero sanding and consuming less paint primer due to the densely closed surface pores. Therefore, the higher initial cost of Finishing Plaster (White Gypsum) is exponentially offset by the reduction in labor and finishing materials.
Conclusion: The Final Verdict on Surface Perfection
Achieving a museum-grade surface is an exact science. Throughout this guide, we have dismantled the myths surrounding Interior wall finishing and replaced them with engineering realities. You cannot achieve professional results with amateur materials. The decision to use Finishing Plaster (White Gypsum) is a decision to prioritize chemical stability over false economy.
Mastering Applying Finish Plaster requires a synergy between skilled labor and superior material science. By utilizing a precision-milled Fine gypsum powder, you eliminate the friction and grit that plague standard plasters. By respecting the hydration limits of Skim coat gypsum, you secure the bond and ensure longevity.
Ultimately, Preventing plaster cracks and achieving that elusive, mirror-like Smooth wall finish is the result of controlling variables. When you control the suction, the mix ratio, and the material quality using Finishing Plaster (White Gypsum), the result is not just a wall—it is a permanent architectural feature. Stop fighting the material. Upgrade your chemistry, refine your technique, and start Applying finish plaster the way professionals demand.
Frequently Asked Questions (FAQ)
Why does my finish plaster crack immediately after drying?
Immediate cracking usually stems from rapid dehydration. If the base coat sucks the water out of the Skim coat gypsum too quickly, the chemical cure is interrupted, leading to shrinkage. To succeed in Preventing plaster cracks, you must control the suction of the substrate and use a plaster with high water retention, like Finishing Plaster (White Gypsum).
Can I apply finish plaster over painted walls?
Applying finish plaster directly over glossy paint is a risk due to poor mechanical keying. You must first sand the painted surface to create a rough texture or apply a bonding agent (like a PVA grit primer). Once the surface has “tooth,” you can apply the Fine gypsum powder mix.
What is the ideal thickness for a skim coat?
A true Smooth wall finish is achieved with thin layers. The total thickness for Applying finish plaster should typically be between 1.5mm and 3mm. Exceeding 5mm in a single coat can lead to sagging and extended drying times, which weakens the final structure.
How do I get a glass-smooth polish without sanding?
Sanding is a corrective measure for poor plastering. The glass finish comes from the final trowel pass (the hard trowel) as the plaster is setting. Using water and heavy pressure on Finishing Plaster (White Gypsum) during the “closing in” phase compresses the surface particles, creating a natural polish that requires zero sanding.