
The causes of wall cracks are rarely mysterious, but site teams often misdiagnose them. A contractor fills a crack, repaints, and the same line returns within a season. That is a diagnosis failure, not a materials failure. This guide sets out the seven mechanisms that crack masonry and plaster, the pattern each one leaves behind, and the repair material that actually holds. Understanding the root cause is the first step to choosing the right repair solution.
7 Common Causes of Wall Cracks
Correct diagnosis removes most repeat repairs: BRE reports that damage in low-rise housing rarely passes Category 2, where redecoration is the correct remedy rather than structural work. When a client asks about cracked walls causes, they usually want two answers — what moved, and what to fill it with. Answer the first question properly and the second becomes simple. Knowing what causes wall cracks in one specific wall, rather than walls in general, is what makes the material choice obvious. In practice, the causes of cracking walls fall into two families. Ground and structure move the wall. Materials shrink, swell, or cure badly inside it. The seven mechanisms below cover almost every case you will meet on a live site.
1. Foundation Settlement
Confirm movement before you fill: NHBC classes a soil as shrinkable when it holds over 35% fines and a modified plasticity index of 10% or more. On such ground the footing lifts and drops with seasonal moisture, and the wall above follows. The load path then concentrates at openings, so you get diagonal cracks at window and door corners, widest at the top. Watch for doors that bind and mortar joints that step. Filling a crack that is still moving simply buys one season.
Risk level: High.
2. Moisture and Water Damage
Fix the water path first, or the repair fails twice. Water enters through a failed damp-proof course, a blocked cavity, a cracked sill, or a leaking gutter. Salts then crystallise behind the finish and push it off the substrate. The result is horizontal banding, flaking, and plaster that sounds hollow when tapped. Historic England stresses that moisture routes are frequently misread on site. Dry the wall, prove the source is closed, then finish. Sealing damp plaster traps the problem and guarantees a callback.
Risk level: Medium to High.
3. Thermal Expansion and Contraction
Design for roughly 1 mm of movement per metre. The BDA gives that figure for lightly restrained brickwork over a building’s life, combining reversible thermal movement with irreversible moisture expansion. A 10 m elevation therefore wants about 10 mm of accommodation. Where the render cannot move, the stress relieves itself as hairline cracks in external plaster, usually on south and west faces first. These are fine, shallow, and often map the substrate joints below. They are cosmetic, but they let water in.
Risk level: Low.
4. Poor Plastering or Finishing
Control the mix and the drying, and this cause disappears. ASTM C926 sets minimum nominal thicknesses: about 16 mm over unit masonry and about 22 mm over metal lath. It also sets curing rules written specifically to resist cracking. Too much gauging water raises shrinkage. Too little suction control lets the background pull water out early. Both produce map cracking in new plaster: a shallow, random grid across the surface. Wind and direct sun on a fresh coat do the same.
Risk level: Low — repairable.
5. Structural Overload
Treat load-path cracks as evidence, not blemishes. Overload appears when someone removes a pier, adds a storey, stacks material on a slab, or bears a beam without a padstone. Masonry then splits vertically under crushing, or diagonally where shear takes over. The giveaway is location: the crack sits directly under or above a bearing point and shows crushed, spalled edges. This pattern needs calculation, not filler. Any surface repair before the load is resolved is cosmetic only.
Risk level: High — engineer required.
6. Shrinkage During Curing
Curing time is the cheapest crack control you can buy. ACI reports drying shrinkage strains reaching about 600 microstrain in concrete, which cracks the material whenever restraint stops it contracting freely. Cement render and screed behave the same way. Rich mixes and very fine sand both raise shrinkage, so check the aggregate grading as well as the gauging water. Shrinkage cracking shows as fine surface hairlines, fairly evenly spaced, appearing within days or weeks of application. Keep the coat damp through early hydration, avoid rich mixes, and let each coat move before the next goes on.
Risk level: Low.
7. Seismic Activity or Vibration
Measure before you accept a vibration claim. BS 7385-2 gives cosmetic damage guide values for residential and unreinforced buildings. These start at 15 mm/s peak particle velocity at 4 Hz. They rise to 20 mm/s at 15 Hz and 50 mm/s above 40 Hz. Below roughly 12.5 mm/s, damage probability tends towards zero. Traffic, piling, and quarry blasting rarely reach those levels at distance. Seismic and vibration cracking runs diagonally or steps through mortar joints, often near corners.
Risk level: Medium to High.is one of the leading causes of wall cracks in commercial projects where speed is prioritized over quality.
How to Identify the Severity of a Wall Crack
Grade the crack before you price the repair. BRE Digest 251 sorts visible damage into six categories, from negligible hairlines up to severe damage above 25 mm. Categories 0 to 2 are aesthetic. Categories 3 and 4 affect weather-tightness and the operation of doors and windows. Category 5 is a stability problem.
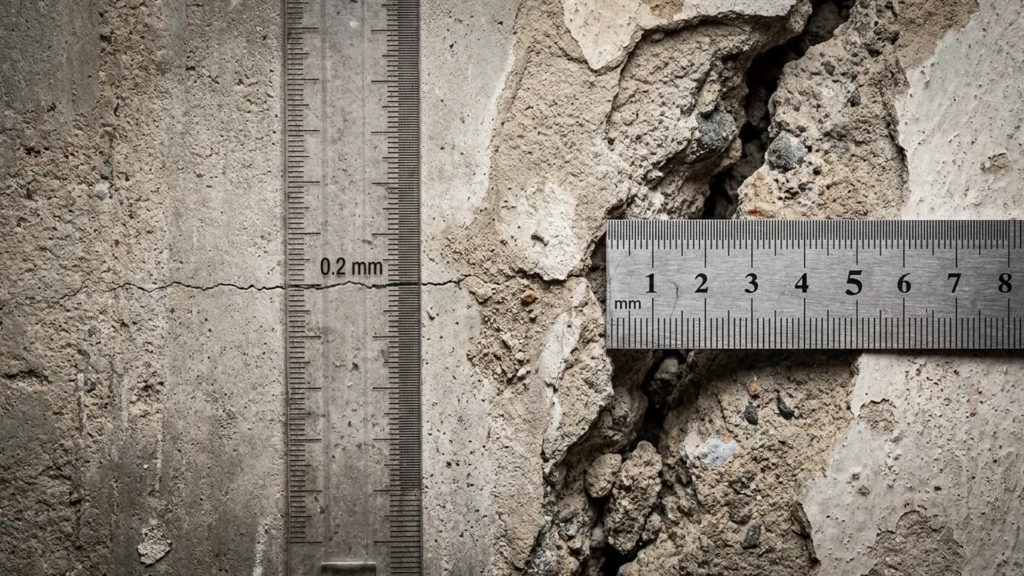
Width alone is not enough, and BRE says so directly. A 2 mm crack that grows over six months matters far more than a stable 4 mm crack that has not moved in a decade. Record width with a crack gauge, mark the ends, date the mark, and check again after a full seasonal cycle. Anyone who understands how to identify the severity of a wall crack works from movement over time, not from a single site visit.
Photograph the crack with a scale rule in frame and keep the file with the job record. On disputed contracts that photograph settles the argument about whether movement began before or after your work. It costs nothing, and it has saved more than one retention payment.
The commercial risk sits here. Misgrading a live structural crack as cosmetic means you supply the wrong material, the repair fails, and you carry the remedial cost plus the reputational damage. That is the most expensive mistake in this whole subject.
| Crack | Appearance | Risk | Solution |
| Hairline | Very thin (< 1 mm) | Low | Putty Powder or skim coat |
| Medium | 1–5 mm | Medium | Filler powder or joint compound |
| Structural | Wide (> 5 mm), diagonal, or growing | High | Structural engineer assessment |
How to Fix Wall Cracks: Choosing the Right Material
Match the material to the movement, not to the width. BS EN 13914-1 covers repair of existing work as well as new rendering, and its logic is straightforward: the repair layer must tolerate whatever the background still does. A rigid product over a moving background always loses. Two questions decide the specification. Is the background still moving, and is the face exposed to weather? Everything else — brand, colour, coverage rate — follows those two answers. The matrix below is the specification shortcut we use on tender reviews.
| Crack condition | Width | Substrate movement | Specify |
| Stable surface hairline | < 1 mm | None | Wall putty or skim coat |
| Stable, opened out | 1–5 mm | None | Cement or gypsum filler powder |
| Stable, external, exposed | 1–5 mm | Thermal only | Polymer-modified flexible filler |
| Active, monitored, still moving | Any | Ongoing | No surface repair yet |
| Structural | > 5 mm or growing | Load or ground | Engineer’s scheme first |
Hairline Cracks — Wall Putty or Skim Coat
Choosing the right product. EN 998-1 requires factory-made mortars to declare adhesion, water absorption, and vapour permeability — so two products can be compared on paper before a single bag is opened. For hairline cracks in external plaster, a wall putty powder carries the repair; coverage rate is a sales figure, not a performance indicator. The one property that actually determines long-term success on external work is vapour permeability class. A tight, low-permeability film traps moisture behind it and blisters within a year. Specify the higher permeability class before anything else.
Application sequence:
- Open the crack slightly with a scraper or grinder and remove all loose material.
- Dampen the background so the putty bonds to a receptive face, not a dust layer.
- Apply in two thin passes, not one thick pull — over-thick putty shrinks and crazes on its own regardless of mix quality.
- Keep total thickness within the manufacturer’s stated limit, which is a function of the binder system, not a conservative suggestion.
One check before mixing. Verify the bag date. Cementitious powders lose reactivity in storage, and a pallet from a damp warehouse will never reach the adhesion the datasheet declares — no matter how carefully it is applied.
Medium Cracks — Filler Powder or Joint Compound
Cracks in this range need body, not just surface levelling. A joint filler powder or a cement-based plaster filler carries the repair; wall putty only levels it afterwards. Specifying putty alone for a 3 mm crack is the most common cause of callbacks in this width class.
The application sequence matters as much as the product:
- Rake the crack to a V-groove and dust it out completely.
- Wet the arris so the filler bonds instead of drying against a dusty face.
- Bed mesh or paper tape into the first pass wherever the crack crosses a change of material — plaster to blockwork, or blockwork to a concrete frame.
- Build the repair in two or three thin passes, curing each one before the next.
Never attempt a single deep pull. It shrinks unevenly and splits down the middle of the groove — producing the same ghost line the repair was meant to remove. This is exactly why ASTM C475 tests joint compounds for shrinkage, bond, and edge cracking: those three failures are what reappear through the paint six months later.
Structural Cracks — Professional Assessment Required
Reference: [IStructE — Cracks in buildings: monitoring to diagnose the cause](https://www.istructe.org/journal/volumes/volume-73-(published-in-1995)/issue-18/guidance-notes-cracks-in-buildings-(monitoring-to/) — Institution guidance on monitoring regimes that establish cause before remedial design.
Some cracks are beyond any filler grade, and recognising them early is the cheapest decision on the project. Contractors regularly ask us where the line sits. The trigger list is short:
- Width over 5 mm
- Diagonal cracks stepping through masonry joints
- Cracks that reappear after a competent repair
- Measurable growth between readings
- Misaligned doors or windows
- Any crack under a bearing point
Each of these points to continuing movement, and no surface product solves movement.
Before anyone specifies a remedy, the crack must be monitored. Fit tell-tales or take gauge readings monthly for at least six months — a single reading proves nothing about direction or rate. The correct sequence is fixed: monitor → diagnose → structural remedy → finishing. Skipping straight to finishing only hides the evidence an engineer will later need.
There is also a liability dimension. Supplying or applying surface materials over a structural defect transfers responsibility to whoever applied them. If the crack meets any trigger above, put the referral recommendation to the client in writing — a verbal warning on site carries no weight once an insurer starts asking who advised what.
Preventing Wall Cracks: Best Practices for Contractors
Detailing prevents far more cracking than product selection ever will, and NHBC’s rules are specific enough to write into a method statement. Design out the movement, and the causes of wall cracks that remain are the ones you can genuinely fill.
- Provide movement joints in long masonry walls. NHBC advises considering joints in rooms with unbroken wall runs over 6 m, and bed joint reinforcement under openings where risk is higher.
- Never mix dissimilar units in one wall. Clay bricks expand while concrete blocks shrink, so a mixed panel cracks along the interface. Where materials must meet, form a tied joint using wire ties or expanded metal at maximum 300 mm centres.
- Write the water-to-powder ratio and the curing regime into the specification. Then check them on site. Most finishing defects start as an unmeasured bucket of water on a hot afternoon.
- Sequence the finish correctly: filler, cure, then a wall putty powder skim coat. Applying a skim coat over a background that is still shrinking simply prints the shrinkage through to the paint.
Conclusion
Diagnosis drives cost. Grade the crack against BRE Digest 251, confirm whether it is moving across a seasonal cycle, and only then open the product catalogue.
Nearly all the causes of wall cracks you will meet resolve into three commercial decisions: skim it, fill and skim it, or stop and call an engineer. Two of those decisions you can make on site with a crack gauge and a dated mark. The third protects your liability.
Keep that sequence on every job: diagnose, monitor, then specify. Reversing it is how a cheap bag of filler becomes a five-figure remedial claim.
Specifiers who buy on declared performance under EN 998-1 or ASTM C475 see far fewer repeat visits than those buying on price per bag. The repair then moves with the wall instead of fighting it.s, here are answers to the most common questions regarding the causes of wall cracks.
FAQ
1. What are the most common causes of wall cracks?
Foundation settlement, moisture ingress, thermal movement, curing shrinkage, poor plastering technique, structural overload, and vibration. Each mechanism leaves a distinct pattern — diagonal, horizontal, map, or stepped — so the pattern tells you which repair specification is correct.
2. Why do walls crack after plastering?
Curing shrinkage is the usual answer, driven by an incorrect water-to-plaster ratio or by drying too fast in hot or windy conditions. These appear as fine surface hairlines and take a quality wall putty skim before repainting.
3. How does Rezvan Micronized Gypsum prevent cracks?
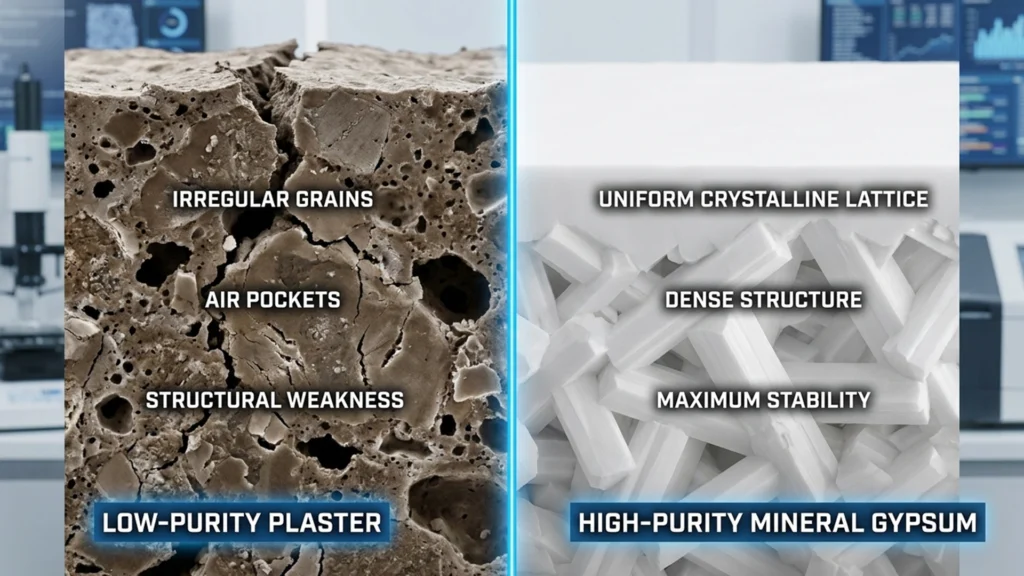
Standard gypsum often contains impurities that disrupt the crystal bonding process. Rezvan Micronized Gypsum is highly purified and ground to a consistent size. This uniformity allows for a denser, stronger crystal lattice structure during curing, which significantly resists the internal tensions that are primary causes of wall cracks.
4. What is the difference between a structural crack and a plaster crack?
A plaster crack is usually thin (hairline), random, and does not extend deep into the masonry. A structural crack is often wider (more than 3mm), follows a stair-step pattern (in brickwork), or extends diagonally from corners of doors/windows. Structural cracks require an engineer, whereas plaster cracks can be fixed with Rezvan Satin Gypsum.
5. What causes hairline cracks in external plaster?
Thermal and moisture movement in the background. The BDA allows roughly 1 mm per metre of lifetime movement in brickwork, and a restrained render relieves that stress as micro-fractures. They are cosmetic, but they admit water, so seal them.
6. How to repair cracks in exterior plaster walls?
Clean and rake the crack, apply a joint filler powder to full depth, cure it fully, then skim with wall putty powder. Above 5 mm, or where the crack returns after repair, get a structural assessment first.